


Printer Approved File Formats for Print Ready Yard Signs in CMYK
For yard sign printing, submit a print-ready PDF (or vector file) with CMYK colors, 0.125" bleed, and fonts embedded or outlined. That single combination clears more printer queues than any other file decision you’ll make, and it works whether you designed the artwork in Illustrator, Canva, or InDesign.
TL;DR:
- Use a print-ready PDF file with CMYK colors, 0.125-inch bleed, and embedded or outlined fonts to ensure compatibility across most printers.
- Vector formats like PDF, EPS, and AI are essential for logos and text, while raster images should be at least 150 DPI at final size to avoid quality loss.
- Convert all files to CMYK before export, set bleed and safe margins properly, and include crop and trim marks for precise cutting.
- Embed or outline all fonts and package linked images to prevent rejection caused by missing elements or font issues.
- Before uploading, verify the file type, color mode, resolution, bleed, and font embedding on the final proof to avoid delays or reprints.
Table of Contents
- Which Yard Sign File Formats Do Printers Accept?
- Vector Vs. Raster: Why Your Logo Needs a Different File Than Your Photo
- What DPI Do You Actually Need for a Yard Sign?
- Setting Color Mode, Bleed, and Safe Margins Correctly
- Handling Fonts and Linked Images So Your File Doesn’t Get Rejected
- Packaging Native Files: What to Include and How to Zip It
- Exporting a Print-Ready PDF: Step-by-Step
- Your Final Checklist Before You Upload
- How YardSigns.com Reviews Your Artwork Before It Prints
- Ready to Print? Here’s the Fast Path
- Sources
Which Yard Sign File Formats Do Printers Accept?
Printers work with a shorter list of file types than most designers expect, and each one has a job.
- PDF: locks fonts, colors, and layout in place, which is why it’s the preferred submission format across the industry.
- AI, EPS, SVG: vector formats that keep logos and text crisp no matter how large the sign gets.
- TIFF, PNG, JPG: raster formats that work fine if the resolution is high and compression is light.
If your file is layered or built from multiple linked assets, you have two paths: send a packaged native file with everything included, or flatten and export a PDF. A PDF is almost always the safer bet, since accepted upload types vary a lot from one printer’s upload page to the next. Some accept AVIF or HEIC. Many don’t. PDF works everywhere.
Vector Vs. Raster: Why Your Logo Needs a Different File Than Your Photo
Vector files store shapes as math, not pixels, so a logo built in Illustrator prints just as sharp at 4 feet as it does at 4 inches. That’s why vector formats like PDF, EPS, and AI are the standard for text, logos, and icons. Raster images, on the other hand, are pixel grids. Enlarge a low-res JPG past its native size and you get soft edges and visible blocks, no matter how good the original photo was.
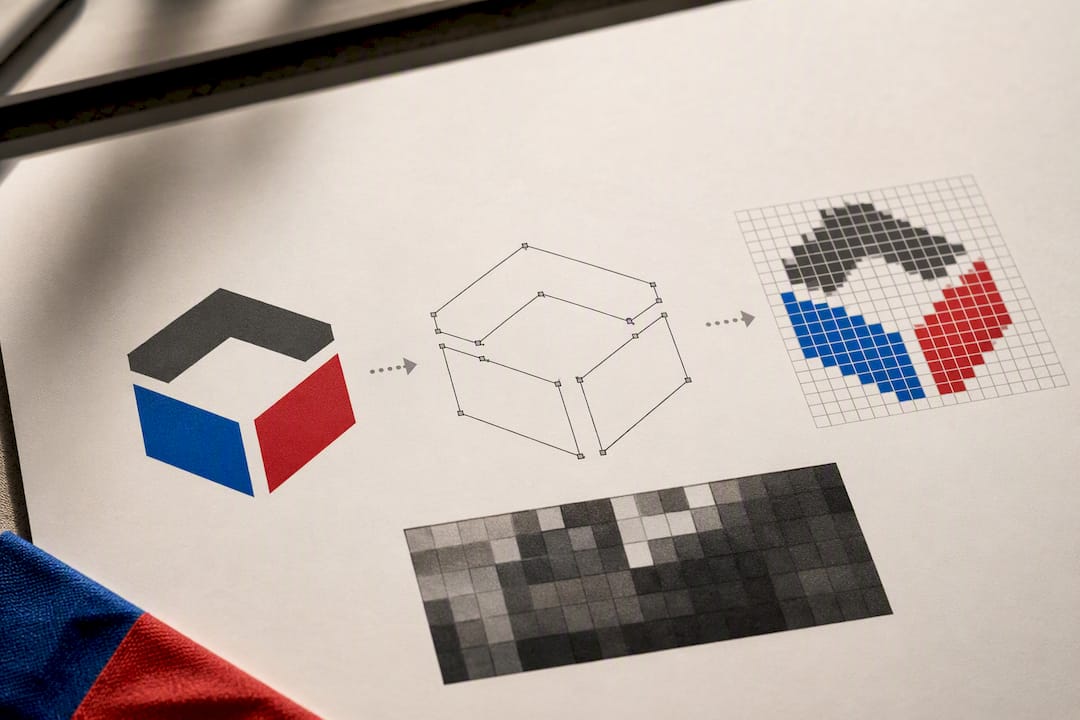
The fix is straightforward: convert text to outlines before export so fonts render correctly, and reserve rasterization for elements that genuinely need it, like photographs or complex drop-shadow effects that vector tools can’t replicate cleanly.
Pro Tip: Keep text as live vector type for as long as possible in your design file, and only convert to outlines right before your final export. It gives you room to fix typos without rebuilding the whole layout.
What DPI Do You Actually Need for a Yard Sign?
Resolution requirements for yard signs are more forgiving than for a business card, but the math still matters. An 18x24 sign at 150 DPI needs roughly 2,700 by 3,600 pixels; at 300 DPI, that jumps to 5,400 by 7,200. A 24x18 sign follows the same ratio in reverse.
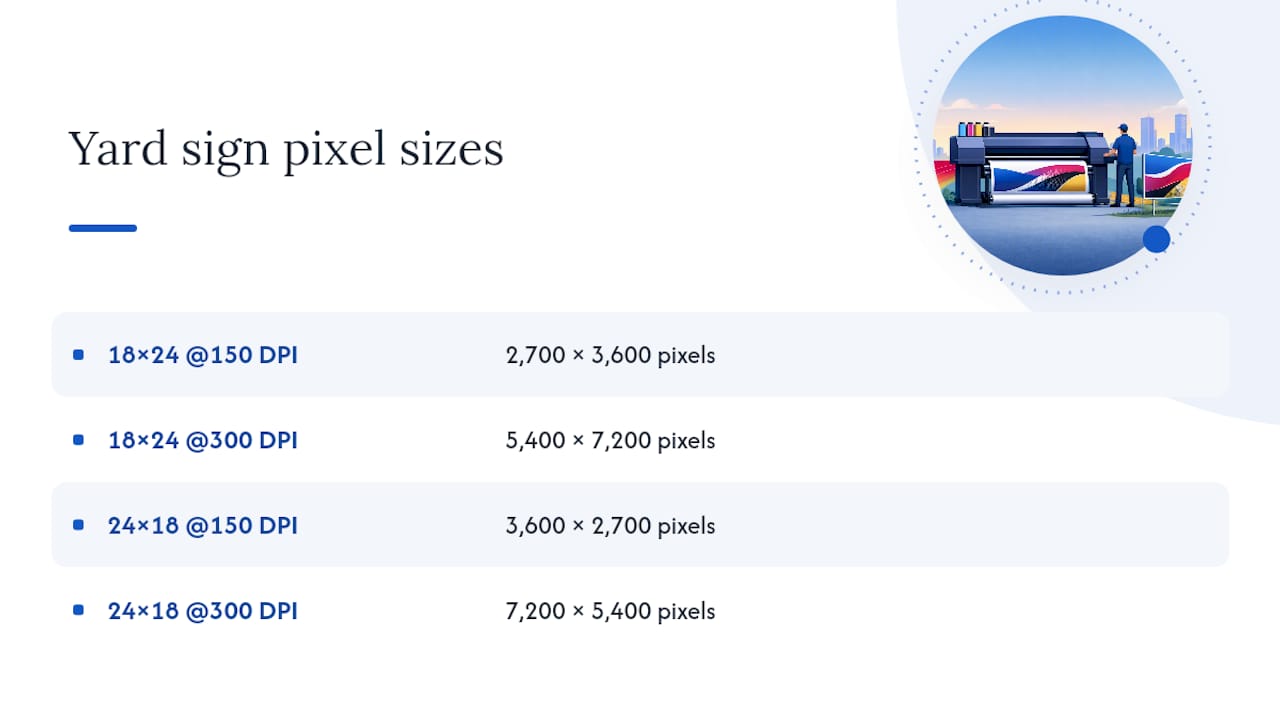
Printers commonly recommend a minimum of 150 DPI at final print size, and that lower number works because yard signs are viewed from the street or the sidewalk, not held six inches from your face. Signs meant for close-up viewing, like a table sign at an event, deserve the higher end of that range.
One thing upsampling won’t fix: stretching a small image up in Photoshop doesn’t add detail, it just makes existing pixels bigger and blurrier. If your source photo is small, either source a higher-resolution version or simplify the design so the image runs smaller on the sign. Before you finalize anything, zoom your file to 100% and check it at actual print size. That’s the only real test.
Setting Color Mode, Bleed, and Safe Margins Correctly
RGB looks vibrant on a screen and dull on paper, so convert every file to CMYK before you export. Printers rely on CMYK to predict how ink will actually lay down, and skipping this step is one of the most common reasons colors shift between proof and final print.
- Set bleed to at least 0.125 inches on every edge where artwork touches the border, and confirm your printer’s exact spec before export.
- Add crop and trim marks so the print shop knows exactly where the cut line falls.
- Keep text and logos at least a quarter inch inside the trim line, in what’s called the safe area, so nothing gets clipped during cutting.
- If a specific brand color matters, like a real estate logo’s exact blue, request a physical or digital proof before the full run prints.
Bleed and safe area both start with a solid layout, which is why it helps to review graphic design layout basics before you set your final trim dimensions.
Handling Fonts and Linked Images So Your File Doesn’t Get Rejected
A missing font or a broken image link is the single most common reason a file bounces back from a printer. Here’s how to avoid it:
- Embed fonts directly in your PDF export, or convert all text to outlines if you’re not certain the printer’s software has your font installed.
- Package or embed every linked image at its final resolution. Don’t leave images linked to a folder on your desktop.
- Name your files clearly, using only letters, numbers, and hyphens. Skip spaces, accents, and symbols like
&or#. - If your layout is font-heavy and complex, consider sending both the font files and a flattened backup PDF, just in case.
Printers that publish artwork specs consistently point back to font outlines and consistent naming as the two easiest fixes for avoiding a rejected upload.
Packaging Native Files: What to Include and How to Zip It
If a printer needs your original layered file rather than a flattened PDF, “packaging” (called Collect for Output in some apps, Package in others) gathers your fonts, linked images, and a summary report into one folder automatically. That folder is what you send, not just the loose design file.
- Compress multi-file packages into a single ZIP before uploading.
- Include a short readme with your name, phone number, and order number.
- If packaging isn’t available or the file’s too complex, fall back to a flattened TIFF or a print-ready PDF instead.
- Save in a widely compatible app version, or just export straight to PDF, since version mismatches are a common cause of failed opens.
Exporting a Print-Ready PDF: Step-by-Step
Getting a clean export takes about five minutes once you know the settings.
- Set your document’s trim size first, then add 0.125" bleed on every side that touches the edge.
- Convert all colors to CMYK, and embed or outline every font in the file.
- Choose the “Press Quality” (or equivalent high-resolution) PDF preset, and turn on crop marks.
- Flatten transparency effects like drop shadows or glows, since some printers can’t process live transparency correctly.
- Confirm your embedded images meet the 300 DPI benchmark for best results, then run a preflight check before saving your final file.
Pro Tip: Save your proof PDF under a different file name than your working file. It stops you from accidentally uploading an unfinished version by mistake.
Your Final Checklist Before You Upload
Run through this before you hit submit. It takes less time than reformatting a rejected order.
- File type confirmed as PDF (preferred) or a supported vector/raster format
- Color mode set to CMYK, not RGB
- Resolution checked at 150 to 300 DPI at actual print size
- Fonts embedded or converted to outlines
- Bleed set to 0.125", trim marks included if required
- Multi-file packages zipped, with a contact readme attached
- Digital proof requested and turnaround window confirmed
| Check item | Target spec |
|---|---|
| File format | Print-ready PDF or vector (AI, EPS, SVG) |
| Color mode | CMYK |
| Resolution | 150 to 300 DPI at final size |
| Bleed | 0.125 inch minimum |
| Fonts | Embedded or outlined |
How YardSigns.com Reviews Your Artwork Before It Prints
Every file that comes through Yardsigns gets a preflight check, catching resolution gaps or missing fonts before they become a printed problem. Orders under 50 pieces still ship within 24 hours, because catching issues early is what keeps that promise realistic. Free proofs and ready-made design templates do most of the heavy lifting, so even a first-time designer can submit a clean file on the first try.
Ready to Print? Here’s the Fast Path
You’ve got the checklist. Now the question is where to actually put it to use, and that’s where Yardsigns earns its keep: fast turnaround on small orders, free proofs on every file, and templates built specifically for the formats printers actually want, so you’re not guessing whether your PDF export will hold up.
Whether you’re printing a congratulations sign for a promotion, a fundraising banner for a school event, or a race-day sign for a charity run, the file rules stay the same, and so does the support. Upload a print-ready PDF and Yardsigns runs it through a preflight check before anything hits the press. If your fonts aren’t embedded or your resolution is low, you’ll hear about it before your order ships, not after. Start with a special event sign or browse the fundraising event templates to see sizing options and get your file moving toward production today.
Sources
A few references are worth bookmarking while you build your file:
- What type of files do you accept for Yard Signs? | 4OVER4
- Artwork Guidelines - YSN wholesale supplier
