


Yard Sign Installation: 2–3 Second Checks for DIYers and Small Crews
For most jobs, drive the stake in first when the soil is hard, rocky, or unfamiliar, and pre-assemble the sign on the stake first when you’re working soft turf or setting up many signs quickly. Before you plant anything, run three checks: sightline (can drivers read it in 2 to 3 seconds), setback (are you clear of the public right-of-way), and utilities (are there no buried lines nearby). Get those right, and the rest of your install goes smoothly.
TL;DR:
- Using stakes-first installation prevents bending or damage when working in hard or rocky soil, while sign-first speeds up placement on soft turf.
- Proper placement involves setting signs behind the sidewalk or around 15 feet from the curb, at driver eye level and tilted toward oncoming traffic for maximum visibility.
- Check for utility lines, local regulations, and right-of-way boundaries before installing, especially in regulated areas like HOAs or near street medians.
- Regularly inspect signs during campaigns to fix leaning stakes, wind damage, or torn panels, replacing cracked or damaged signs immediately.
- For complex jobs like electrical or permanent signage, hiring an insured professional ensures safety, permit handling, and compliance with local rules.
Table of Contents
- What Do You Need for Yard Sign Installation?
- How Do You Install a Yard Sign, Step by Step?
- Where Should You Place a Yard Sign for Maximum Visibility?
- How Do You Handle Hard Soil, Frozen Ground, or Rocky Lots?
- What Safety and Legal Checks Come Before You Install?
- How Do You Maintain and Fix Yard Signs Once They’re Installed?
- When Should You Hire a Professional Installer?
- What Do Reliable Sign Suppliers Actually Deliver?
- Installer Perspective: The Mistakes That Cost the Most Time
- Get Durable Panels Ready Before Your Next Install
- Sources
What Do You Need for Yard Sign Installation?
A single-run install and a multi-stop campaign day need almost the same kit, just different quantities. Standard practice calls for 18×24-inch corrugated plastic panels (often called Coroplast) paired with wire H-stakes. That size gives you enough surface for readable copy without becoming unwieldy in wind.
Pack these basics every time:
- 18×24 Coroplast panels (or your standard size)
- H-frame wire stakes, one set per sign
- Work gloves to protect your hands from stake tines and rough panel edges
- A rubber mallet or push block for stubborn ground
- A tape measure for consistent setback and height
For tougher conditions or bigger campaigns, add heavy-duty frames, extra-long stakes, grommets or zip ties for fence mounts, and a couple of sandbags for windy open lots.
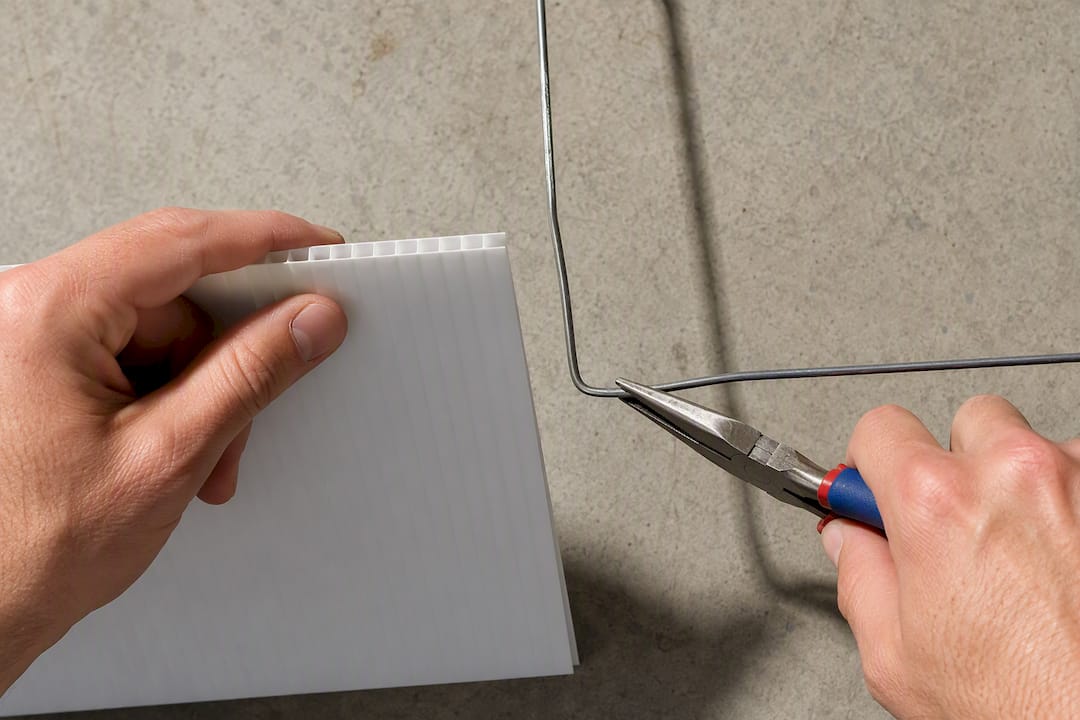
Before you leave the shop or garage, check every panel edge for cracks, make sure the corrugated flutes run vertically (this affects both rigidity and wind resistance), and straighten any bent stake tines. A bent tine rarely survives a second use.
How Do You Install a Yard Sign, Step by Step?
Two methods cover almost every situation you’ll run into. Pick based on ground condition and how many signs you’re placing.
Stakes-first method (best for hard or unknown soil):
- Mark your spot and confirm it’s clear of utilities and the right-of-way.
- Drive the stake using steady foot pressure on the bottom crossbar, or tap it with a rubber mallet.
- Check that the stake sits plumb, not leaning.
- Slide the sign panel down onto the stake tines until it’s seated.
Sign-first method (best for soft turf or fast, high-volume placement):
- Assemble the panel onto the stake before you even leave the vehicle.
- Position the assembled unit at your spot and press straight down.
- Use a push block against the top of the panel to distribute force evenly rather than bending the plastic.
Soil condition and volume decide which method wins. Hard clay or gravel calls for stakes-first, since forcing an assembled sign into resistant ground usually bends the tines or tears the flutes at the stake slots. Soft residential lawns and large campaign drops favor sign-first, because pre-assembling panels in the vehicle and using a push block keeps a two-person crew moving fast without cracking panels.
Pro Tip: Assign one person to scout and mark spots while the other drives stakes. Two people working in sequence beat one person doing both jobs twice as fast, not just half.
Where Should You Place a Yard Sign for Maximum Visibility?
Placement decides whether your sign gets read or gets removed. Start with setback: the public right-of-way commonly runs 10 to 15 feet from the curb, and a sign planted inside that zone risks being pulled by a public works crew. The safer bet is behind the sidewalk, or roughly 15 feet from the curb where no sidewalk exists.
Height and angle matter just as much as distance. Aim for these targets:
- Center the panel roughly one to two feet above ground level for driver eye height
- Tilt the sign approximately thirty to forty-five degrees toward oncoming traffic
- Keep at least a few feet of clear space around each sign so it doesn’t compete visually with mailboxes, other signs, or landscaping
- Space multiple signs far enough apart that drivers process one message before reaching the next
Run the 2 to 3 second readability test: stand where a passing driver would, and see if you can read the main message in that window. If you can’t, the text is too small, too busy, or the sign sits at the wrong angle. Corner lots offer a bonus move real estate agents use often: placing two signs back to back at the vertex captures traffic from both directions at once.
How Do You Handle Hard Soil, Frozen Ground, or Rocky Lots?
Ground condition breaks more stakes than any other factor in yard sign installation. Before you force anything, try the water-soak trick professionals rely on: pour about half a gallon of water on the spot and wait roughly 10 minutes. That’s usually enough to soften compacted clay or dry summer turf.
For frozen ground or soil packed with small rocks, skip straight to a pilot hole. A masonry drill bit clears a path the stake can follow without bending.
A few technique notes that save your hardware:
- Push with even foot pressure on the crossbar rather than stomping
- Never hammer directly on the tines; use a rubber mallet or push block on the top rail instead
- Switch to heavy-duty frames or longer stakes when standard hardware keeps bending
- On surfaces that won’t take a stake at all, like asphalt or thin soil over rock, consider an alternative mount
Pro Tip: A bent tine is a lost stake. Once the metal kinks, it won’t hold plumb no matter how you drive it. Straighten minor bends immediately or swap the stake before you waste a trip back to the vehicle.
If your project calls for something more permanent than a temporary yard sign, mounting hardware built for posts and footings, like the options covered in this flagpole installation guide, offers a useful comparison point for ground conditions that need deeper anchoring.
What Safety and Legal Checks Come Before You Install?
Skipping these checks is how installers end up with fines, removed signs, or a shovel through a buried cable. Run through this list before the first stake goes in the ground:
- Look for utility markers or call your local utility locate service before driving stakes in unfamiliar ground
- Confirm you’re outside the public right-of-way, typically the first 10 to 15 feet from the curb
- Never staple or mount signs on utility poles or medians; both are regulated and removal is common
- Check HOA rules separately from city code. HOAs frequently enforce tighter restrictions than municipal ordinances, especially on duration and sign count
- Build sign-duration limits into client contracts, covering the project window plus a few extra days for teardown
- Confirm whether your sign needs permit approval, which is more likely for larger commercial installations or anything left up long term
How Do You Maintain and Fix Yard Signs Once They’re Installed?
Check installed signs daily during the first week of a campaign, then at least weekly after that. Look for leaning stakes, wind damage, and panels knocked loose by mowing crews or curious pets.
Quick fixes cover most problems:
- Re-seat a leaning stake or move it a few inches to firmer ground
- Add a second stake for extra hold in loose soil or high wind
- Tie the panel to a permissible fence line where stakes won’t hold
- Cut small wind slits in oversized panels to reduce sail effect
Replace a panel once the corrugation cracks or flutes tear at the stake slots. A cracked panel looks unprofessional fast, and patching rarely holds through a full campaign.
When Should You Hire a Professional Installer?
DIY covers most temporary yard sign work, but certain jobs call for a pro. Electrical signage, permanent post mounting, complicated permit applications, and unsafe terrain (steep grades, heavy traffic medians) all shift the calculus toward hiring out.
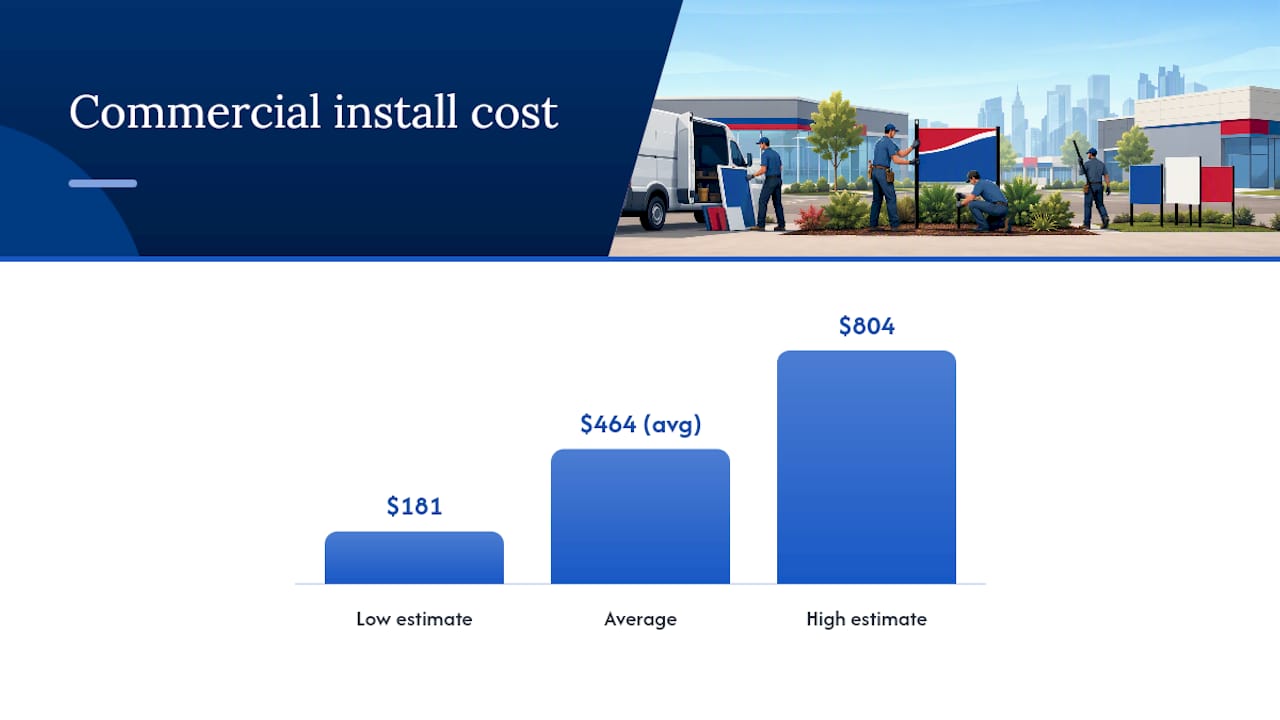
Cost varies with complexity. Commercial sign installation typically runs from about $181 to $804, averaging near $464, with permit fees and electrical work adding hundreds to thousands more on top of that base range.
Before hiring anyone, ask:
- Are you insured for this type of installation work?
- Will you handle permit applications, or is that on me?
- What’s your turnaround time from signed contract to completed install?
- Can you provide references from similar jobs?
Budget a cushion for contingencies. Extra panels and permit fees have a way of showing up after the quote is already signed.
What Do Reliable Sign Suppliers Actually Deliver?
A dependable supplier prints on weatherproof Coroplast with UV-resistant inks, includes or offers H-stakes, and sends a proof before production. Order a few spare panels and stakes with your main run, and ask about rush shipping. Quick-turn printing on small orders can shave real time off a campaign timeline.
Installer Perspective: The Mistakes That Cost the Most Time
The biggest time-wasters aren’t equipment problems. They’re rushed sightline checks, skipped utility scans, and crews working solo instead of splitting scout-and-stake roles. Pre-assemble in the vehicle, assign roles, and plan your route before the first stake goes in.
— YardSignGuy
Get Durable Panels Ready Before Your Next Install
Reliable suppliers offer durable panels printed on weatherproof Coroplast with UV-resistant inks, include metal H-stakes, and provide fast shipping: many ship most small orders within 24 hours.
That turnaround matters most when a campaign changes overnight and you need replacement panels before the weekend open house. Order a few spares along with your main run so a torn flute or a missing sign never leaves a gap in your coverage. Free proofs and unlimited revisions mean you catch layout mistakes before they’re printed, not after they’re planted in someone’s front yard.
Browse the special event signage options to see sizing and stake configurations before you place your next order, and build in a spare panel or two for the campaign ahead.
Sources
- HomeAdvisor — Cost to Make and Install Signs
- CheapRUSH Printing — Yard sign placement rules guide
- Image Square Printing — Professional guide to high-impact placement
