


24 Hour Delivery and Durable Curbside Pickup Signage for Stores
Set up three things today: an entry directional sign, numbered stall markers, and a clear arrival-instructions sign or window decal at the pickup point. That combination gets first-time customers to the right spot without circling the lot, and it costs less than most owners expect. Once those three are in place, everything else in this guide is refinement.
TL;DR:
- Signage should include an entrance directional sign, numbered stall markers, and a clear arrival-instructions sign for quick customer guidance.
- Aluminum signs with reflective sheeting last longer and are more visible at night compared to coroplast, especially in high-traffic lots.
- Sign size should be at least 24x36 inches for entrance signs and smaller for stall markers, with high contrast for maximum legibility from a distance.
- Proper placement involves layered signs at the entrance, mid-lot, and each stall, with walk-through testing to ensure visibility from the driver’s perspective.
- Quick turnaround shipping under 50 signs within 24 hours enables timely deployment, reducing delays caused by damaged or missing signs.
Table of Contents
- Which Curbside Pickup Signage Types Should You Use?
- What Materials Hold Up Best Outdoors?
- How Big Should Curbside Pickup Signs Be?
- Where Should You Place Signs So Drivers Find Pickup Fast?
- What Should Your Curbside Pickup Signs Say?
- How Do You Mount Curbside Signs Securely?
- What Should You Confirm Before You Order?
- Do Curbside Signs Need to Meet Accessibility Rules?
- How Much Should Curbside Pickup Signage Cost?
- How Do You Keep Signs Legible for Years, Not Months?
- How Should Signage Fit Into Your Curbside Workflow?
- Publisher Perspective: Why Fast Turnaround Actually Matters
- How YardSigns.com Makes Ordering Curbside Signage Simple
- Sources
Which Curbside Pickup Signage Types Should You Use?
The right mix depends on your lot, not your budget. A-frame signs work well at entrances because they’re portable and you can reposition them for special hours or events. Post-mounted stall markers hold up better in high-traffic areas since nobody’s kicking them over. Window decals cost less than any freestanding sign but only work if customers can see them from a parked car. Directional pennants and pavement arrows fill the gaps between the other three.
Here’s how the mix typically breaks down by lot size:
- Small storefront (1 to 3 stalls): one A-frame at the door, plus a window decal marking the pickup window.
- Mid-size lot (4 to 6 stalls): entrance directional sign, post-mounted numbers at each stall, one arrival-instructions panel.
- Large lot (7+ stalls): entrance sign, a mid-lot confirmation sign, numbered post-mounted markers at every stall, and reflective striping for after-dark pickup.
What Materials Hold Up Best Outdoors?
Corrugated plastic, known as coroplast, is the cheapest option and fine for short promotions, but sun and wind wear it down within a season or two. Aluminum costs more up front and survives years of parking-lot abuse, including the occasional bumper tap.
Most curbside signage set to run past a single season should go on aluminum, not coroplast — the wind resistance and print retention pay for the price difference within a year for any business running curbside daily.
Reflective sheeting matters more than most owners assume:
- Standard 3M Engineer Grade reflective sheeting makes stall numbers and directional arrows visible to headlights well before a driver reaches the marker.
- Reflective is worth the upcharge for any lot with evening or early-morning pickup traffic.
- UV-resistant inks and laminate coatings slow fading; expect several years of solid color retention on aluminum versus a single season on unlaminated coroplast.
How Big Should Curbside Pickup Signs Be?
Size and contrast determine whether a driver reads your sign in time to react. Entrance directional signs work best at 24×36 or 36×48 inches, with lettering tall enough to read from 50 feet or more. Stall markers can run smaller, typically 24×36 or 18×24, since drivers are closer and moving slower by that point. Free template packs built for curbside programs use those exact dimensions along with printer specs, which saves a reprint if your file doesn’t match panel size.
Contrast decides legibility more than size does:
- Black text on yellow or white background reads fastest in daylight.
- Navy on neon yellow, the same pairing used on many custom A-frame curbside panels, holds up in overcast conditions too.
- Avoid red-on-green or blue-on-black combinations; both are hard to distinguish at a glance from a moving vehicle.
- Add reflective overlays or a low-cost solar spotlight on any sign your team relies on after dusk, rather than trying to light the whole lot.
Where Should You Place Signs So Drivers Find Pickup Fast?
Think in tiers, not single markers. Signage research on curbside programs consistently points to a layered approach over one-off stall labels: entrance directional signage followed by mid-lot confirmation and stall-level markers gets customers to the right spot without a second loop through the lot.
- Entrance directional sign at the lot entry, angled toward inbound traffic.
- Mid-lot confirmation sign if the pickup area isn’t visible from the entrance.
- Numbered stall marker at each designated spot, oriented to the lane drivers will actually be in.
- Arrival instructions sign or decal at the stall or window with the final action step.
Angled parking usually needs fewer signs than perpendicular rows because drivers see stall numbers earlier in their approach. Multiple entrances each need their own directional sign; one at the main entrance isn’t enough if a second entrance feeds the same lot. The most common mistake is mounting stall numbers to face the sidewalk instead of the driving lane, which means the customer never sees the number until they’ve already parked in the wrong spot.
Pro Tip: Walk the approach path in your own car before finalizing sign placement. If you can’t read the stall number from the lane you’d actually be driving in, neither can your customers.
What Should Your Curbside Pickup Signs Say?
Drivers skim, they don’t read. Every arrival-instructions sign needs four things and nothing more: the service label (“Curbside Pickup”), the stall number in large digits, one short action (“Call or text on arrival”), and a phone number set apart in its own high-contrast band.
- Keep total word count under 15 words per panel; anything longer gets ignored from a moving car.
- Make stall numbers the largest element on the panel, larger than your business name.
- Put the phone number on a separate color block so it doesn’t compete with the stall number for attention.
- Save your logo for the top corner or the back panel. It matters for branding, but it should never shrink the parts customers actually need to act on.
Pro Tip: If a customer has to lean forward and squint to find your phone number, you’ll get a phone call asking where to park instead of a smooth pickup.
How Do You Mount Curbside Signs Securely?
Mounting choice depends on how long the sign stays and how much wind or foot traffic it faces. H-stakes work for quick, temporary setups and cost the least. Weighted or sandbagged A-frame bases suit entrances where you need to reposition signs for events or seasonal hours. Bolt-down post kits are the right call for permanent stall markers in high-traffic lots, and portable base systems built for curbside programs let you add extra weight modules for wind-prone areas without pouring concrete.
- H-stakes: fast, cheap, best for short-term promotions.
- Sandbagged A-frame bases: portable, good for entrances that change layout seasonally.
- Bolt-down post kits: most stable, best for permanent stall markers.
- Added weight modules: worth it in open lots or coastal areas with regular high wind.
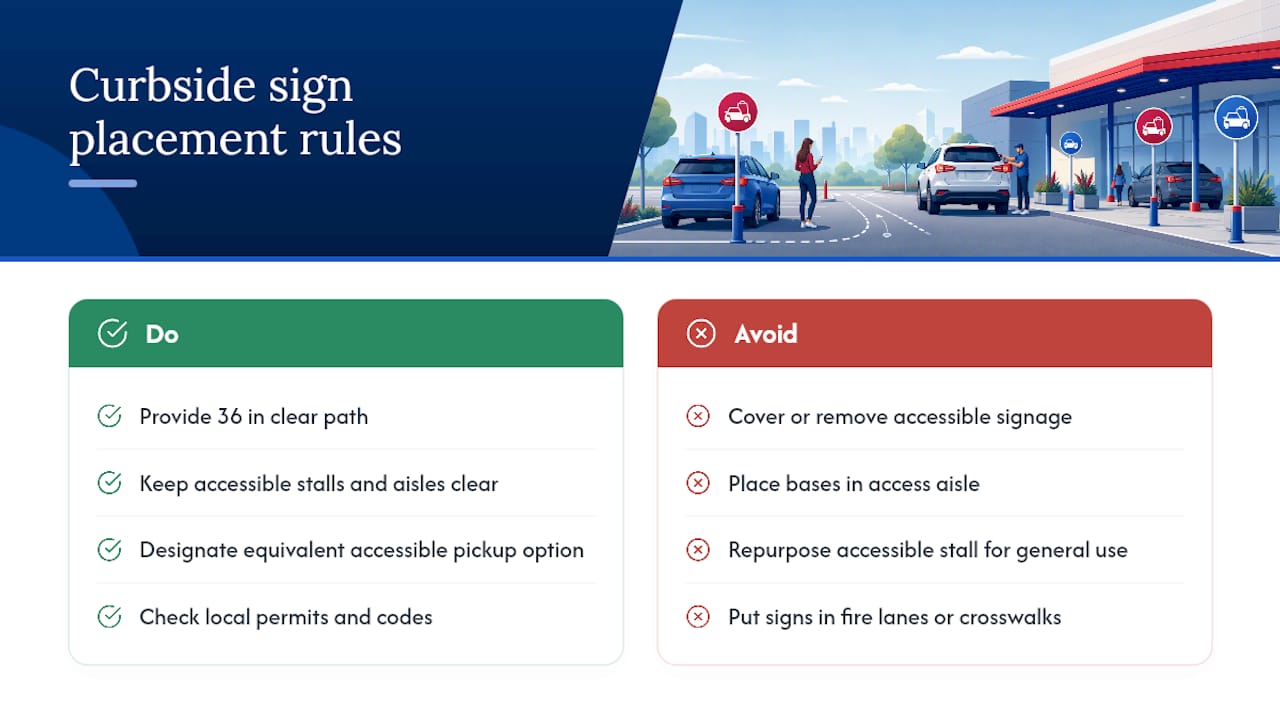
Keep a minimum 36-inch clear path around any base to stay clear of accessible route requirements, and check that no sign or base intrudes into a marked accessible aisle.
What Should You Confirm Before You Order?
Before you submit an order, walk through a short checklist so you’re not waiting on a reprint later.
- Confirm exact sizes for each sign type: entrance, stall marker, decal.
- Choose material thickness and confirm reflective sheeting where you need after-dark visibility.
- Decide on mounting hardware: H-stakes, posts, or weighted bases.
- Check file specs against the template’s printer requirements, including punch holes and lamination.
- Order one or two spare panels per stall count in case of damage.
Turnaround expectations vary by order size. Orders under 50 pieces from Yardsigns typically ship within 24 hours, which matters if you’re rolling out curbside pickup on short notice or replacing a damaged panel before a weekend rush. Larger runs usually take one to three days. Request a digital proof before final approval and check it against your own measurements, not just the screen preview, since punch-hole placement and panel trim can shift slightly between preview and print.
Do Curbside Signs Need to Meet Accessibility Rules?
Curbside pickup signage sits at the intersection of parking regulation and general accessibility law, and most violations aren’t about the sign’s message. They’re about placement. If any part of your curbside pickup area overlaps a marked accessible parking space or its access aisle, that space keeps its required signage and clearance regardless of your pickup program. You can’t cover, block, or repurpose an accessible stall for general curbside use without designating an equivalent accessible pickup option elsewhere.
Ground-mounted sign bases and A-frame stands need a minimum of 36 inches of clear path on any route a customer with a mobility device would use to reach the pickup stall or store entrance. That’s the same clearance standard used for general accessible routes, and it applies whether the sign is temporary or permanent. Avoid placing weighted bases, sandbags, or post kits directly in a designated access aisle even for a few hours during a busy shift.
Local rules vary by municipality on top of these general principles. Some cities regulate A-frame sign placement on public right-of-way, require a permit for signs that extend past a certain distance from the building, or restrict how close a temporary sign can sit to a fire lane or crosswalk. Check with your local planning or code enforcement office before finalizing placement, especially for entrance signs near a public sidewalk or street. A five-minute call beats a fine or a forced teardown during your first week of curbside operations.
How Much Should Curbside Pickup Signage Cost?
Budgeting for curbside signage comes down to three cost drivers: material, quantity, and reflective options. Coroplast panels are the least expensive per unit and make sense for short promotional runs or a single-season test of curbside pickup. Aluminum panels cost more per sign but often offer better longevity for businesses running curbside pickup as a permanent service.
Reflective sheeting adds a noticeable line item to your order, but it’s a one-time cost against a sign that otherwise lasts years. Skipping reflective on evening-heavy pickup traffic tends to cost more in confused customers and blocked lanes than the upcharge would have.
Total cost also depends on how many sign types you order, not just how many stalls you have. A mid-size lot with four to six stalls typically needs an entrance sign, a handful of stall markers, and one or two arrival-instructions panels, not a custom sign for every square foot of pavement. Mounting hardware is a separate line: H-stakes are close to free, while bolt-down posts and weighted bases cost more but rarely need replacing.
Build in a small buffer for spare panels. A stall marker damaged by a delivery truck or a rough winter shouldn’t take your curbside program offline while you wait on a reorder. Ordering one or two spares per sign type at the same time as your initial order avoids a second shipping charge and a gap in coverage. Bulk discounts on larger orders also make it cheaper to order spares up front than to reorder piecemeal later.
How Do You Keep Signs Legible for Years, Not Months?
Weather is the real cost of ownership for outdoor signage, and most owners underestimate how fast the sun does damage. UV exposure fades ink long before wind or rain physically damages a panel, which is why UV-resistant printing matters more for lifespan than material thickness alone. Aluminum resists warping and denting far better than coroplast, but even aluminum needs a decent laminate or UV-rated ink to hold color through a full summer of direct sun.
A quick seasonal check catches most problems early: look for fading text, loose mounting hardware, and bases that have shifted or tipped from wind or repeated bumps. Stall markers near drive lanes take more physical abuse than entrance signs set back from traffic, so inspect those first. Replace decals and window clings sooner than freestanding signs. Adhesive backing and window glass exposure age faster than a mounted aluminum panel.
Keep a simple maintenance log, even an informal one. Noting when each sign went up and roughly how it’s holding up tells you whether a given material or vendor is actually delivering the lifespan promised, and it flags which signs are due for replacement before a customer complains about a faded or unreadable stall number.
How Should Signage Fit Into Your Curbside Workflow?
Signage only works if it matches how your staff actually run curbside pickup, not how the process looks on paper. If your team calls customers when an order is ready, the arrival-instructions sign needs to say “text on arrival,” not “call inside,” or you’ll get customers walking in instead of waiting in their stall. Match the sign’s instructions to the exact step your staff expects the customer to take next.
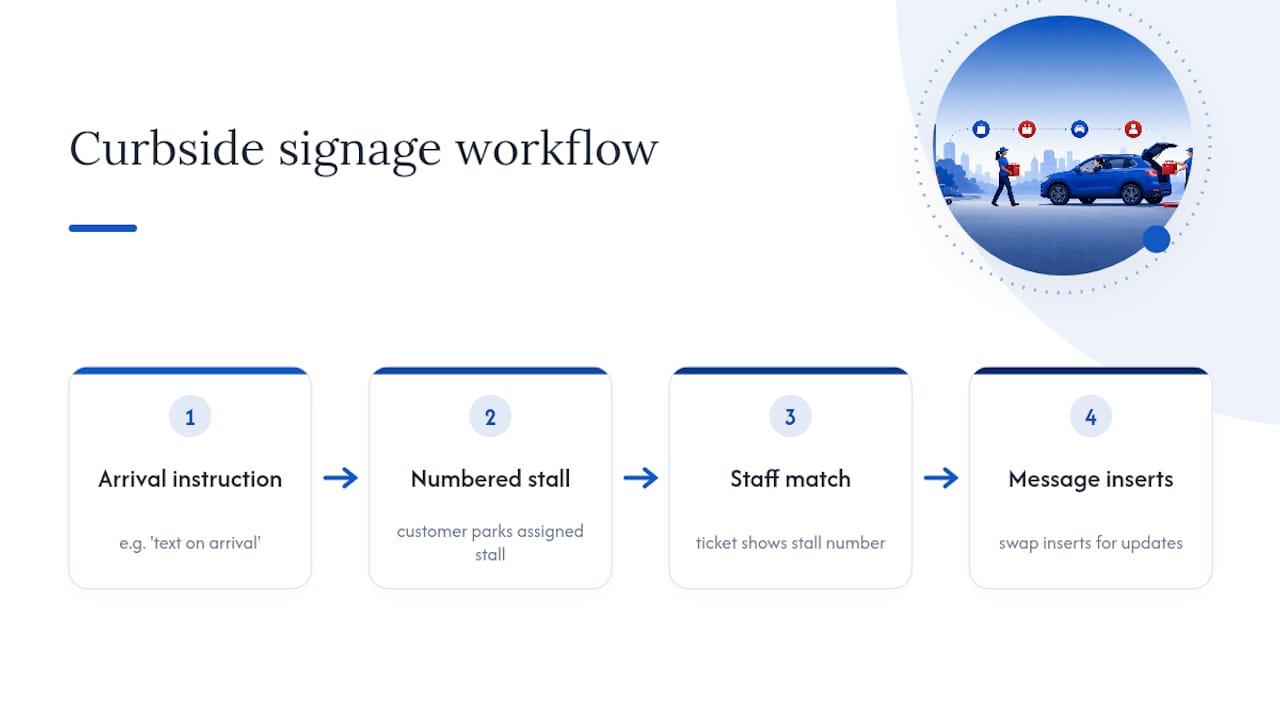
Numbered stalls only help if your staff also uses those numbers internally. When an order ticket lists a stall number, staff can locate the right car in seconds instead of scanning the lot. That small alignment between signage and internal process is often the difference between a two-minute pickup and a five-minute one, especially during lunch or dinner rushes.
Using interchangeable message inserts on a subset of your signs lets you update a phone number or add a holiday note without replacing full panels. Review your signage plan each time you change your pickup process, add a stall, or shift operating hours. A sign system built once and never revisited tends to drift out of sync with how the business actually runs within a year.
Publisher Perspective: Why Fast Turnaround Actually Matters
Most curbside programs don’t fail because the signage plan was wrong. They fail because a damaged stall marker sat unreplaced for two weeks while the business waited on a slow reorder. Fast turnaround isn’t a marketing line item. It’s the difference between a lot that runs smoothly and one where staff are improvising directions by shouting across the parking lot.
— YardSignGuy
How YardSigns.com Makes Ordering Curbside Signage Simple
Getting the sign mix right matters less if the order itself takes two weeks to arrive. That’s the gap Yardsigns closes: orders under 50 pieces ship within 24 hours, so a damaged stall marker or a last-minute curbside rollout doesn’t leave your lot short a sign for a week.
Every order includes weatherproof aluminum or corrugated plastic, UV-resistant printing, and the option to add reflective sheeting for lots running pickup after dark, as seen on the Restroom Reserved For Customers Metal Sign with durable metal finishes. Free design proofs and unlimited revisions mean you’re not guessing whether your stall numbers will actually be legible from a driving lane before you commit to a full print run. Metal H-stakes come included, so you’re not scrambling for mounting hardware after the signs arrive.
Before you place an order, confirm four things: material thickness, whether you need reflective sheeting, prepunched holes for your mounting hardware, and how many double-sided panels you need for angled parking. If you’re setting up signage for a broader event or promotion alongside your curbside program, Yardsigns’s fundraising event signs use the same weatherproof materials and fast turnaround. Start with a design proof request and you’ll know your exact sizes and materials before you spend a dollar on the full run.
Sources
For deeper technical detail, review the free curbside signage templates for exact dimensions, the portable sign base specs for mounting options, and Yardsigns’s material comparison guide for durability tradeoffs.
- Top 10 Considerations When Designing Your Curbside Pickup Program - FlexPost Inc.
- Curbside Pickup Signage Templates: Free Downloads 2025
- Curbside Pickup Sign Base Systems - RubberForm
