


Outdoor Sign Placement for Retail Stores That Works
Outdoor sign placement for retail stores is the process of strategically positioning signage to maximize visibility, attract customers, and comply with local regulations. Get it right and your signs pull foot traffic from the street before a single ad dollar is spent. Get it wrong and you have an expensive sign that nobody reads. This article covers the core principles of sign visibility, the legal constraints you cannot ignore, and a practical method for testing placements at your specific location. Whether you are working with A-frame sidewalk signs, blade signs, totem signs, or window decals, the placement decisions you make today directly shape how many customers walk through your door tomorrow. Yardsigns has helped thousands of retail businesses get this right, and the principles here reflect what actually works in the field.
What factors determine the best outdoor sign locations for retailers?
The best sign locations for retailers come down to four factors: sightlines, traffic speed, legal setbacks, and environmental conditions. Each one can override the others if ignored.
Sightlines and approach angles
Your sign must be visible from the direction customers are actually arriving. That sounds obvious, but many retailers place signs facing the building rather than the street approach. Drive-by viewing at real speeds and angles is the standard method for validating whether a placement works. Walk or drive the approach routes yourself before committing to a location. Trees, parked vehicles, utility poles, and competing signs are the most common obstructions, and they shift with the seasons. A sign that is perfectly visible in January may be completely hidden by a mature oak in July.
Traffic speed and reading time
The faster traffic moves past your store, the larger and simpler your sign needs to be. A driver moving at 45 mph has roughly two to three seconds to read a sign. Outdoor sign readability follows the rule of 1 inch of letter height per 10 feet of viewing distance, and messages should stay at five to seven words maximum. That means a sign readable from 100 feet needs letters at least 10 inches tall. Pedestrian-focused signs can carry more detail because foot traffic moves slowly enough to absorb it.
Legal and zoning constraints
Local codes set hard limits on where signs can physically go, regardless of what works best for visibility. Projecting signs and clear-view triangles are two of the most commonly misunderstood restrictions. Clear-view triangle rules prohibit signs within specific corner zones to preserve driver sightlines at intersections. Spokane’s municipal code also restricts how far projecting signs can extend into road right-of-way. These rules exist in virtually every municipality, though the exact measurements vary. Check with your local planning department before installing anything permanent.
New sign permits are required for any erection, alteration, or relocation of signage in most jurisdictions, and applications typically require a site plan, scaled drawings, and illumination details. Skipping the permit process is the fastest way to face a removal order and a fine.
- Setbacks: Most codes require freestanding signs to sit a minimum distance from the property line or road edge.
- Height limits: Maximum sign heights vary by zone type, with commercial corridors typically allowing taller structures than mixed-use zones.
- Clear-view triangles: Signs cannot be placed within the triangular zone at intersections that must remain clear for driver visibility.
- Right-of-way restrictions: Signs cannot extend into public road right-of-way without specific permits, which are rarely granted for retail use.
- Illumination rules: Lit signs often require separate permits and must meet brightness standards to avoid light pollution violations.
Pro Tip: Before you finalize any sign location, pull your municipality’s sign ordinance and check the specific zone your property sits in. Commercial zones, mixed-use zones, and historic districts each carry different rules, and a five-minute check saves weeks of compliance headaches.
Environmental conditions
Glare, weather exposure, and nighttime visibility all affect where a sign performs best. A sign facing west catches direct afternoon sun, which can wash out colors and make it unreadable during peak afternoon shopping hours. Weatherproof materials and UV-resistant inks extend the life of signs in exposed positions. If your location gets significant snow or wind, factor in structural clearance and anchoring requirements from the start.
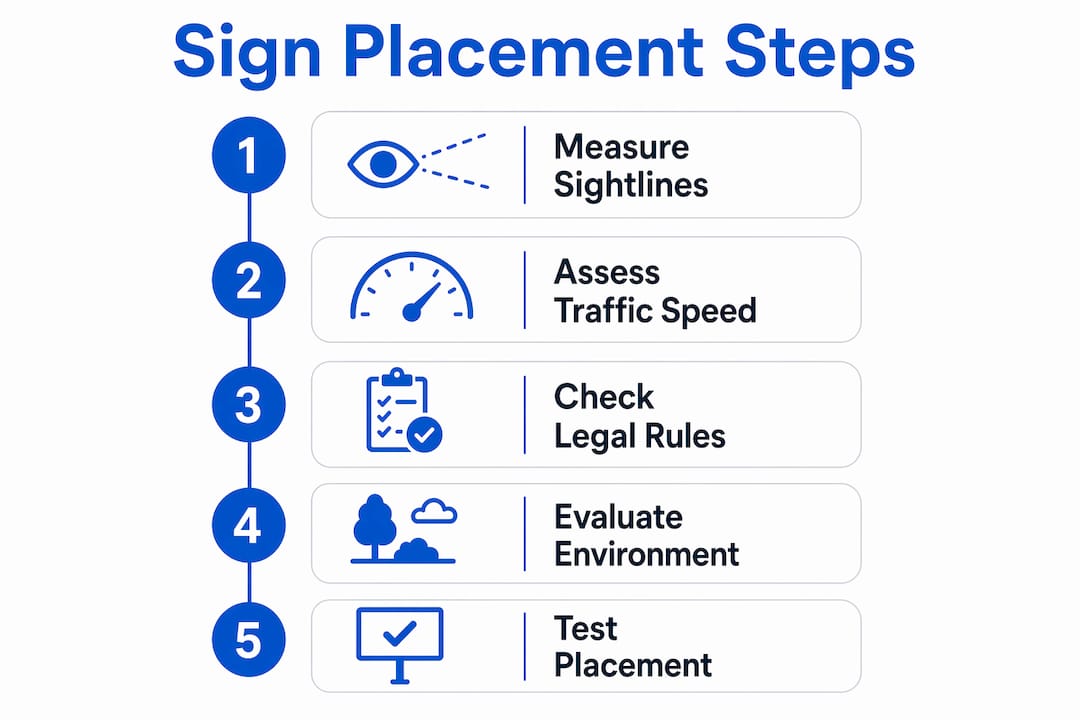
How to choose and test effective outdoor sign placements
Choosing the right placement is a field exercise, not a desk decision. Here is a practical method that works for any retail location.
- Map your approach directions. Identify every route customers use to arrive at your store, including foot traffic from parking lots, bus stops, and adjacent businesses. Each approach direction is a potential sign placement opportunity.
- Observe traffic patterns for one hour. Stand at your entrance and count how many people arrive from each direction. Prioritize sign placements toward the highest-volume approaches first.
- Conduct a drive-by test. Have someone stand at your proposed sign location while you drive or walk the approach at normal speed. Note whether the location is visible, at what distance it becomes readable, and whether any obstructions block the view.
- Check for seasonal obstructions. Visibility cones should be verified across different times of year, since trees, temporary structures, and parked delivery vehicles can block sightlines that appear clear during your initial assessment.
- Confirm legal clearances. Measure setbacks from the road edge and property line. Verify the location sits outside any clear-view triangle zones. Check height limits for the sign type you plan to use.
- Plan maintenance access. A sign you cannot reach to clean, repair, or update becomes a liability. Totem signs require a clear zone of 1.5 to 2.0 meters around them for safe maintenance access.
Pro Tip: Use a temporary stake or cardboard mockup at your proposed location and photograph it from every approach direction. This low-cost test reveals obstructions and angle problems before you spend money on fabrication or installation.
The table below summarizes the key placement tests and what each one confirms.
| Test | What it confirms |
|---|---|
| Drive-by visibility test | Sign is readable from approach at real traffic speed |
| Seasonal obstruction check | No trees or structures block view year-round |
| Setback measurement | Placement complies with local zoning distance rules |
| Maintenance access check | Clear zone exists for cleaning and repairs |
| Sightline angle review | Sign faces primary customer approach direction |
When you run multiple signs at one location, space them to avoid visual clutter. Each sign should serve a distinct purpose: one for brand identification, one for a specific promotion, and one for directional guidance. Stacking too many messages in one zone reduces the impact of all of them.
How placement strategies differ by sign type
Different sign types serve different visibility functions, and each one has specific placement requirements.
| Sign type | Best placement | Key consideration |
|---|---|---|
| A-frame (sidewalk) | At the sidewalk edge near the entrance | Pedestrian sightline height; must not block walkway |
| Blade/projecting sign | Mounted perpendicular to the building facade | Cannot extend into road right-of-way without permit |
| Totem/monument sign | Near the property entrance facing primary road | Sightline clearance of 2 to 3 seconds at 30 to 50 km/h traffic speed |
| Window decals | Lower third of window at eye level | Avoid blocking interior visibility; keep message brief |
| Flags/banners | High-visibility corner or entrance point | Height must clear pedestrian traffic; anchoring for wind |
A-frame signs work best for pedestrian-heavy environments. Place them at the point where foot traffic makes a decision about entering, typically 3 to 6 feet from the entrance. They should sit at eye level for a standing adult, roughly 4 to 5 feet to the top of the message area.
Blade signs project perpendicular to the building and are designed to be read by pedestrians walking along the sidewalk rather than drivers approaching from the front. Freestanding sign setbacks and frontage rules apply to projecting signs in many codes, so confirm clearances before installation. The bottom of a blade sign should clear pedestrian head height by at least 8 feet.
Totem and monument signs are the workhorses of retail park and strip mall visibility. They need to be positioned so drivers have a clear two to three second sightline before the turn-in point. Pedestrian-readable panels on totem signs should sit between 0.6 and 0.8 meters above ground level, which places them in the natural reading zone for someone walking past.
Window decals are often underused as a placement tool. The lower third of a storefront window at eye level is prime real estate for a short promotional message. Keep the message to five words or fewer so it reads in a single glance.
Common mistakes in outdoor sign placement and how to avoid them
Most sign placement failures come down to a short list of repeatable errors. Recognizing them before installation saves you money and compliance trouble.
- Placing signs behind obstructions. Blocked signs from trees, vehicles, or competing signage are the leading cause of missed customer attention. Always confirm the view is clear from every approach direction.
- Ignoring permit requirements. Installing a sign without the required permit exposes you to fines and forced removal. The permit process also catches placement problems before they become expensive mistakes.
- Overcrowding the sign zone. Three signs competing for attention in the same visual field produce less impact than one well-placed sign. Each sign needs visual breathing room to register with a passing customer.
- Mismatching sign height to customer sightlines. A sign mounted at 15 feet works for drivers but is invisible to pedestrians looking straight ahead. Match the height to the primary audience for that sign.
- Neglecting nighttime visibility. A sign that is unreadable after dark loses half its potential exposure. If your store is open evenings, illumination is not optional.
“Signage placement is a visibility problem first and a design problem second. The best-looking sign in the world delivers zero value if it sits behind a delivery truck every morning.”
Pairing strong outdoor placement with effective interior signage compounds the effect. Checkout signage converts at a higher rate than almost any other in-store placement because customers are stationary and have time to read. Getting customers through the door with outdoor signs and then guiding them to a purchase with interior signs is the complete strategy.
Key takeaways
Effective outdoor sign placement combines clear sightlines, legal compliance, and sign-type-specific positioning to drive measurable foot traffic to your retail store.
| Point | Details |
|---|---|
| Sightlines come first | Confirm visibility from every approach direction before finalizing any placement. |
| Legal constraints are non-negotiable | Permits, setbacks, and clear-view triangle rules must be checked before installation. |
| Match height to audience | Pedestrian-focused signs need lower placement than vehicle-focused signs. |
| Test before you commit | A drive-by test and seasonal obstruction check prevent costly placement errors. |
| Pair outdoor with indoor | Outdoor signs attract customers; interior signs at checkout convert them. |
What I have learned from years of watching signs succeed and fail
I have seen retailers spend serious money on beautifully designed signs that nobody reads, and I have seen simple corrugated signs on stakes outperform them because they were placed at exactly the right spot on the approach. The difference is almost never the sign itself. It is the placement decision.
The mistake I see most often is treating sign placement as a one-time decision. Retail environments change. A new business opens next door and suddenly your totem sign is competing with three others. A tree grows out and blocks your blade sign by August. The retailers who get the most from their signage treat placement as something they revisit at least once a year.
I also think the legal compliance side is underappreciated as a strategic asset. Yes, permits and setback rules feel like bureaucratic friction. But working within those constraints forces you to think carefully about where your sign actually goes, and that discipline produces better placements than an unconstrained guess would. The retailers who skip permits and install wherever they want often end up with signs in legally problematic locations that also happen to be poor visibility locations.
One more thing: do not neglect the outdoor signage advantages that come from physical presence. A well-placed outdoor sign works 24 hours a day with no ongoing cost. That return on investment compounds over time in a way that paid digital ads simply do not.
— YardSignGuy
Get the right signs for your retail location
Yardsigns offers durable, weatherproof outdoor signs built for retail environments where visibility and longevity both matter. From sidewalk A-frames to custom yard signs sized for high-traffic approaches, every product ships with vibrant, UV-resistant printing that holds up through seasons of sun, rain, and wind. Orders under 50 pieces ship within 24 hours, so you can move fast when a promotion or grand reopening demands it. Browse the retail sign options at Yardsigns to find the right format for your location, or visit yardsigns.com to start designing a sign that works as hard as you do.
FAQ
What is the best location for an outdoor retail sign?
The best location is the spot with the clearest sightline from your primary customer approach direction, positioned above typical obstructions and within legal setback limits. Conduct a drive-by test at real traffic speeds to confirm the placement before installation.
How high should an outdoor retail sign be mounted?
Height depends on the audience. Signs targeting drivers should clear typical vehicle and obstruction heights, while pedestrian-focused signs perform best with message areas between 4 and 6 feet above ground. Totem sign pedestrian panels are most readable at 0.6 to 0.8 meters above ground level.
Do I need a permit for an outdoor retail sign?
Most jurisdictions require a permit for any new sign, alteration, or relocation. Permit applications typically include a site plan, scaled drawings, and illumination details. Check your local municipal code before installing any permanent or semi-permanent sign.
How do I avoid sign placement mistakes?
Confirm visibility from all approach directions, check for seasonal obstructions like trees, verify legal setbacks and clear-view triangle restrictions, and avoid placing multiple signs in the same visual zone. A temporary mockup test before fabrication catches most placement problems at zero cost.
How many outdoor signs does a retail store need?
Most retail locations benefit from three distinct sign functions: brand identification, promotional messaging, and directional guidance. Each sign should serve one purpose and have enough visual separation from the others to register independently with passing customers.
