


What Does Sign Staking Mean Outdoors? A 2026 Guide
Sign staking outdoors is defined as anchoring an outdoor sign into soft ground using metal or plastic stakes, most commonly 9-gauge galvanized steel H-wire frames, to keep the sign upright and visible. The industry term for this practice is “ground sign installation,” though “sign staking” is the phrase most buyers and installers use in the field. Understanding what does sign staking mean outdoors goes beyond just pushing a stake into the dirt. The right stake type, installation method, and placement location all determine whether your sign stands firm for a weekend or survives a full season.
What does sign staking mean outdoors, and how does it work?
Sign staking is the process of inserting a stake through the internal flutes of a corrugated plastic sign panel and driving it into the ground. The flutes are the hollow channels running vertically through the sign material. They act as sleeves that grip the stake and hold the panel rigid. Standard H-stakes are 30 inches tall and made from 9-gauge galvanized steel wire bent into an H-shape, with two vertical posts that slide into the flutes and a horizontal crossbar that sits behind the panel.
The method works because the stake transfers wind load and lateral pressure from the sign panel into the ground. Without a stake, a corrugated plastic sign laid against a surface or propped up will shift, fall, or blow away within hours. Staking solves that problem by creating a direct mechanical connection between the sign and the earth beneath it.

Corrugated plastic, also called Coroplast, is the standard material for staked outdoor signs. It is lightweight, weather-resistant, and inexpensive to print on. The combination of corrugated plastic panels and galvanized steel stakes is the most common outdoor sign staking setup for real estate listings, political campaigns, retail promotions, and event announcements.
What types of stakes are used for outdoor sign staking?
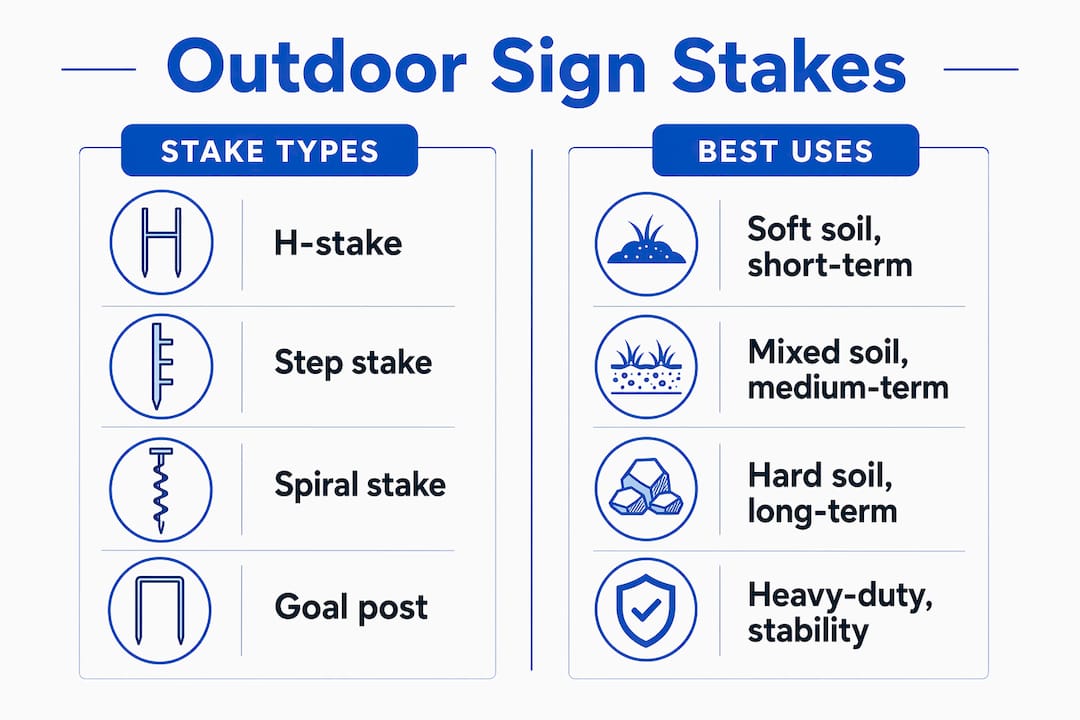
Four stake types cover the vast majority of outdoor sign installations: H-stakes, step stakes, spiral stakes, and rigid goal post frames. Each suits different soil conditions, sign sizes, and campaign lengths.
H-stakes are the default choice for short-term residential use. They are lightweight, inexpensive, and easy to install by hand. Their limitation is soft or sandy soil, where they can lean or pull out after rain.
Step stakes have a flat foot plate at the base that you press down with your foot, similar to a garden spade. They penetrate harder soil more reliably than H-stakes and hold better in clay or compacted ground.
Spiral stakes use a corkscrew design that threads into the soil rather than being pushed straight down. Spiral stakes handle soil expansion, moisture, and wind better than wire-based H-stakes, making them the right choice for installations lasting beyond 60 days.
Goal post frames are made from thick galvanized steel and form a rigid rectangular border around the sign. Heavy-duty goal post stakes resist bending in windy conditions and are ideal for commercial campaigns or high-traffic locations where sign failure is not an option.
| Stake type | Best soil | Installation ease | Durability |
|---|---|---|---|
| H-stake | Soft, loose | Very easy | Short-term (under 60 days) |
| Step stake | Medium, clay | Easy | Medium-term |
| Spiral stake | Hard, compacted | Moderate | Long-term (60+ days) |
| Goal post frame | Any | Requires tools | Commercial grade |
Pro Tip: Signs wider than 30 inches need two stakes for stability. Using a single stake on a wide panel creates a pivot point that lets the sign spin and bend in wind.
How to properly install stakes for outdoor signs
Correct installation protects both the sign and the ground around it. Follow these steps to get a stable, level result every time.
- Call 811 before you stake. Contacting 811 confirms there are no underground gas, water, or electrical lines in your target area. Skipping this step can cause dangerous and costly damage.
- Test the soil. Push a screwdriver or thin rod into the ground first. If it meets hard resistance, switch to a step stake or spiral stake rather than forcing an H-stake.
- Slide the stake into the flutes. Insert both vertical posts of the H-stake into the sign’s internal channels from the bottom edge of the panel.
- Push on the stake posts, not the sign panel. Applying pressure to the sign panel damages the corrugated plastic flutes and causes premature bending or creasing. Always press down on the metal crossbar or the stake posts only.
- Drive the stake to the correct depth. The crossbar should sit flush against the back of the sign, with at least 8–10 inches of stake in the ground for stability.
- Level and orient the sign. Face the sign toward the primary direction of traffic flow. Use a small level or step back and check visually from the road.
- Check for lean after 24 hours. Soil settles after the first day. A quick check lets you correct any lean before it worsens.
Pro Tip: Avoid installing stakes in waterlogged soil after heavy rain. Saturated ground loses grip strength, and stakes installed in wet conditions often lean within 48 hours once the soil dries and contracts.
What legal and placement restrictions affect outdoor sign staking?
Sign placement on public property is tightly regulated. Misplaced signs can increase accident risk, and local governments enforce minimum clearances from intersections, traffic signals, and sidewalks. Knowing the rules before you stake prevents fines and wasted materials.
“Most jurisdictions prohibit placing signs on public rights-of-way, medians, utility poles, or traffic islands. Violations can result in fines or immediate sign removal by local authorities.”
The U.S. Supreme Court case City Council v. Taxpayers for Vincent (1984) upheld bans on signage on utility poles to prevent visual clutter. That ruling set a legal precedent that municipalities across the country still rely on when writing local sign ordinances.
Common placement restrictions you need to know:
- Public rights-of-way: Signs staked in the strip between the sidewalk and the street are often on public property, even if they appear to be on private land. Check your local ordinance before placing signs there.
- Medians and traffic islands: Staking signs in medians is prohibited in most cities because it obstructs driver sightlines.
- Utility poles and traffic signals: Attaching signs to poles is illegal in most jurisdictions and can result in immediate removal and fines.
- Intersection clearances: Many municipalities require signs to be set back a minimum distance from intersections to preserve visibility for drivers.
- Temporary sign permits: Some cities require a permit even for short-term yard signs on private property. Check with your local planning department before a large campaign.
The safest approach is to stake signs on private property with the owner’s permission, set back from the road edge, and oriented toward traffic without blocking sightlines. For outdoor sign placement in retail or commercial settings, always confirm zoning rules with your local municipality before installation day.
How to choose the right stake for your campaign and conditions
The right staking solution depends on three factors: how long the sign will be up, what the soil is like, and how large the sign is. Getting this match right saves money and prevents sign failure.
Short-term residential campaigns (under 30 days): H-stakes are the right choice. They are fast to install, easy to remove, and cost-effective for high-volume placements like political campaigns or open house signs. Soft suburban lawns are ideal for H-stakes.
Medium-term retail or event signage (30–60 days): Step stakes offer better holding power in mixed soil conditions. They suit retail parking lots, community event sites, and construction perimeters where foot traffic and vehicle vibration can loosen lighter stakes.
Long-term commercial installations (60+ days): Wire-based H-stakes are usually insufficient beyond 60 days. Spiral stakes or goal post frames handle the repeated stress of wind, rain, and soil movement that accumulates over a longer campaign. Yardsigns offers weatherproof signage options designed to pair with heavier-duty stake systems for exactly these conditions.
High-wind or exposed locations: Use two stakes per sign regardless of sign size. Goal post frames are the most reliable option for open fields, roadsides, or coastal areas where wind gusts are frequent.
Large format signs (over 18" x 24"): A single H-stake creates a flex point that causes the panel to flap and eventually crack. Two stakes, placed in the outer flutes on each side of the panel, distribute the load and prevent this.
For a broader view of which sign formats suit different campaigns, the outdoor promotional signage guide from Yardsigns covers stake compatibility across sign types in detail.
What are the most common sign staking mistakes?
Most sign failures in the field trace back to a short list of avoidable errors. Recognizing them before installation saves time, money, and frustration.
- Pushing on the sign panel during installation. This is the single most common mistake. Pressure applied to the panel crushes the corrugated flutes and weakens the sign permanently. Always push on the stake posts.
- Using one stake on a wide sign. Signs over 30 inches wide need two stakes. A single stake leaves the panel free to pivot and flex, which leads to cracking at the stake insertion point.
- Ignoring soil conditions. Forcing an H-stake into hard clay or rocky soil bends the stake and leaves it loose. Match the stake type to the soil before you start.
- Skipping the 811 call. Underground utility lines are not visible from the surface. Driving a stake through a gas or electrical line is a serious safety hazard.
- Placing signs in prohibited locations. Signs staked on medians, utility poles, or public rights-of-way get removed quickly and may generate fines. Always confirm the placement is on private property or a permitted public location.
Pro Tip: Check your signs 48 hours after installation and again after any significant rain or wind event. Early corrections prevent a leaning sign from becoming a fallen one.
Key Takeaways
Effective outdoor sign staking requires matching the right stake type to your soil, sign size, and campaign duration while following local placement regulations.
| Point | Details |
|---|---|
| Sign staking definition | Anchoring corrugated plastic signs into the ground using metal or plastic stakes for stability and visibility. |
| Stake selection matters | Match H-stakes to short campaigns, spiral stakes to long-term or hard-soil installations, and goal post frames to commercial use. |
| Installation technique | Always push on stake posts, never the sign panel, to avoid crushing the corrugated flutes. |
| Call 811 first | Confirm no underground utilities exist at your staking location before driving any stake into the ground. |
| Legal compliance | Avoid public rights-of-way, medians, and utility poles. Stake only on private property or permitted locations. |
What I’ve learned from watching signs fail in the field
I have seen more sign campaigns go sideways from poor staking than from bad design. A beautifully printed sign face-down in the mud after the first windy night is a waste of every dollar spent on it. The fix is almost always simple: the wrong stake for the soil, or one stake where two were needed.
The detail that surprises most people is how much soil type changes the equation. A standard H-stake that holds perfectly in a soft suburban lawn will pull clean out of compacted clay after one rainstorm. Installers who do not test the soil first end up replacing stakes they should have chosen correctly from the start.
Regulatory compliance is the other area where I see real money lost. Signs placed on medians or public strips get pulled by code enforcement within days, sometimes hours. The cost of reprinting and restaking adds up fast. A five-minute check of local ordinances before a campaign launch prevents that entirely.
The materials have improved significantly in recent years. Galvanized steel stakes now hold their coating longer, and corrugated plastic panels are thicker and more UV-resistant than they were a decade ago. That means a well-chosen stake and a quality sign panel can realistically last a full season outdoors without replacement. The investment in getting the setup right the first time pays for itself.
— YardSignGuy
Signs and stakes built for real outdoor conditions
Yardsigns prints weatherproof corrugated plastic signs designed to work with the stake types covered in this guide. Orders under 50 pieces ship within 24 hours, so you can respond to a campaign need without waiting weeks for materials.
Whether you need a short-run residential sign with standard H-stakes or a commercial-grade setup for a longer campaign, Yardsigns has options sized and printed for outdoor performance. Browse customizable yard signs built for business promotions, or check out ready-to-ship event and congratulations signs with stake-compatible panels. Every sign ships with vibrant, fade-resistant printing that holds up through wind, rain, and direct sun.
FAQ
What does sign staking mean outdoors?
Sign staking outdoors means anchoring a corrugated plastic sign into soft ground using metal or plastic stakes, typically 9-gauge galvanized steel H-wire frames, to keep the sign upright and visible.
What is the most common stake type for yard signs?
The H-stake is the most common stake for yard signs. It is a 30-inch galvanized steel wire frame with two vertical posts that slide into the sign’s internal flutes.
How deep should sign stakes go into the ground?
Stakes should penetrate at least 8–10 inches into the ground for reliable stability. Deeper insertion is recommended in sandy or loose soil.
Is it legal to stake signs on public property?
Most jurisdictions prohibit staking signs on public rights-of-way, medians, and utility poles. The Supreme Court case City Council v. Taxpayers for Vincent (1984) upheld these restrictions, and violations typically result in fines or sign removal.
When should you use spiral stakes instead of H-stakes?
Use spiral stakes for installations lasting beyond 60 days or in hard, compacted, or clay-heavy soil where standard H-stakes cannot penetrate or hold reliably.
